How to Install NVIDIA Container Toolkit on Ubuntu?
In this tutorial, we will guide you through the process of installing the NVIDIA Container Toolkit on Ubuntu. This toolkit allows you to build and run GPU-accelerated Docker containers, which is crucial for many AI and machine learning applications. Let’s get started!
What is the NVIDIA Container Toolkit?
The NVIDIA Container Toolkit is a set of tools that enables the use of NVIDIA GPUs within containers. It integrates with Docker and other container runtimes to provide GPU-accelerated computing in a containerized environment. This toolkit is essential for developers and researchers who need to leverage GPU power for deep learning, AI, and other computationally intensive tasks.
1. Install NVIDIA GPU Driver
Before installing the NVIDIA GPU driver, you need to install the necessary packages to compile the driver.
Step 1: Install Required Packages
Open a terminal and run the following command to install make and gcc:
sudo apt install -y make gcc
Step 2: Download NVIDIA Driver
Visit the NVIDIA Driver Download page, select your GPU model, and choose “Linux 64-bit” as the operating system. Download the .run file, which will be named something like NVIDIA-Linux-x86_64-XXX.run.
Step 3: Install NVIDIA Driver
Once you have downloaded the driver, navigate to the directory containing the driver package and run the following command to install it:
sudo sh ./NVIDIA-Linux-x86_64-XXX.run
Replace XXX with the version number of the driver you downloaded.
2. Install Docker
Docker is a platform for developing, shipping, and running applications inside containers. Follow these steps to install Docker on your system.
Step 1: Install Docker
Run the following command to download and install Docker:
curl https://get.docker.com | sh
Step 2: Enable Docker Service
Enable and start the Docker service with the following command:
sudo systemctl --now enable docker
Step 3: Add User to Docker Group
To run Docker commands without sudo, add your user to the Docker group:
sudo groupadd docker
sudo usermod -aG docker $USER
Restart the Docker service:
sudo systemctl restart docker
Step 4: Reboot System
Reboot your system to apply the changes:
sudo reboot
3. Install NVIDIA Container Toolkit
With Docker installed, you can now install the NVIDIA Container Toolkit to enable GPU acceleration in Docker containers.
Step 1: Add NVIDIA Package Repositories
Add the NVIDIA package repositories and the GPG key:
curl -fsSL https://nvidia.github.io/libnvidia-container/gpgkey | sudo gpg --dearmor -o /usr/share/keyrings/nvidia-container-toolkit-keyring.gpg
curl -s -L https://nvidia.github.io/libnvidia-container/stable/deb/nvidia-container-toolkit.list | sed 's#deb https://#deb [signed-by=/usr/share/keyrings/nvidia-container-toolkit-keyring.gpg] https://#g' | sudo tee /etc/apt/sources.list.d/nvidia-container-toolkit.list
Step 2: Update Package List
Update the package list:
sudo apt-get update
Step 3: Install NVIDIA Container Toolkit
Install the toolkit with the following command:
sudo apt-get install -y nvidia-container-toolkit
Step 4: Configure NVIDIA Runtime
Configure the NVIDIA runtime for Docker:
sudo nvidia-ctk runtime configure --runtime=docker
Step 5: Restart Docker
Restart the Docker service to apply the changes:
sudo systemctl restart docker
Test Docker Container with GPU
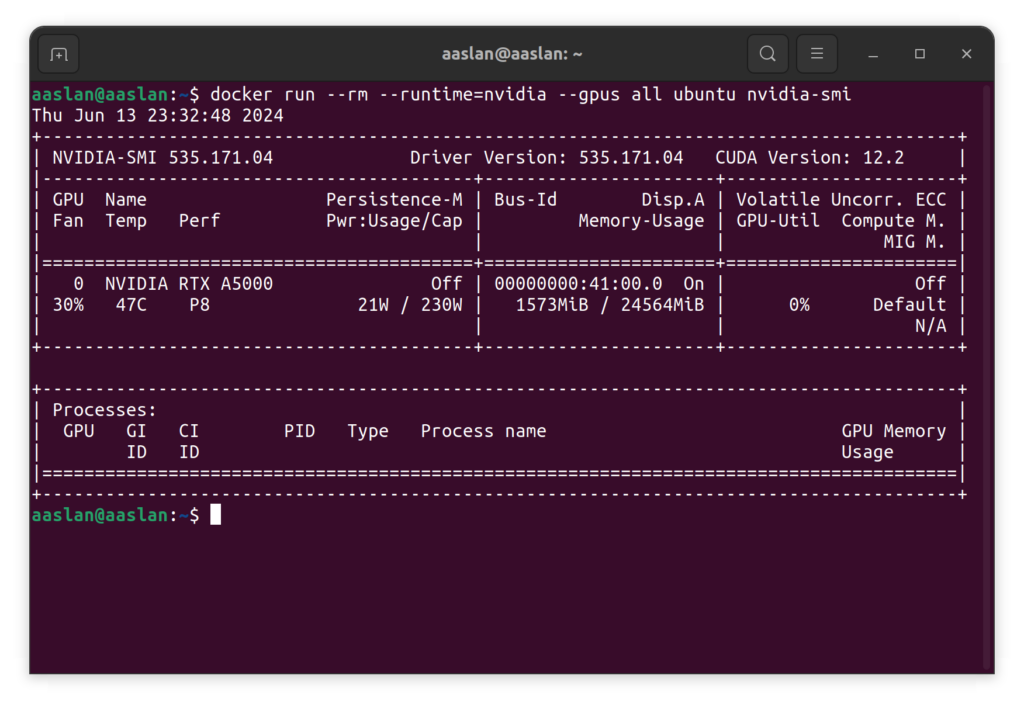
To verify that the NVIDIA Container Toolkit is installed correctly and working, run the following command:
docker run --rm --runtime=nvidia --gpus all ubuntu nvidia-smi
This command runs a Docker container using the NVIDIA CUDA image and checks the GPU status using nvidia-smi.
If everything is set up correctly, you should see the details of your NVIDIA GPU.

Congratulations! You have successfully installed the NVIDIA Container Toolkit on Ubuntu. You can now start leveraging the power of NVIDIA GPUs within Docker containers for your AI and machine learning projects.


